Background

Friday, November 11, 2011

Cranberry Apple Crunch--So Much Better Than Cranberry Sauce!

Cranberry Apple Crunch...
NOT your average holiday cranberry goop  "sauce."  

On your marks...
     Get set...
          Go, holiday season!

Whether we are ready for it or not, it doesn't matter...
The holiday season is here!  It's time to get to work on fulfilling those Christmas lists, transforming your home into a cozy seasonal atmosphere, preparing Thanksgiving menus, starting the fire place, dreaming of a "White Christmas," etc., etc., etc.

Any formally-fat person (and even most forever-skinny people) LOVES the holidays because of food!  I mean, let's face it--you can have family time any time of the year if you'd like.  We give gifts for many occasions.  Men sit around a TV to watch football most Saturdays all fall and winter.  We should be thankful all the time.  We should remember that God sent his son to earth to die for us all the time...and we also celebrate this at Easter.  The thing that really sets the holidays--or at least Thanksgiving--a part from other times of the year is the menu!

Let me just tell you I LOVE dressing, turkey, green beans, corn casserole, pumpkin pie, and all of that jazz, but the one thing I don't like is cranberry sauce (...or sweet potatoes, but that doesn't fit this posts' purpose haha).  However, this dish turned my tastes around!  

I'm not really sure where this recipe originated.  It came from my Dad's side of the family when I was about ten years old.  (I know that because I had many a years of that gelatin, cranberry nastiness put on my plate before then.)  My mom got the recipe from my Dad's aunt that year, and we've been eating it ever since!

So if you're like me and you think that canned stuff is totally disgusting, you might want to give this a try!  It's the PERFECT alternative to cranberry sauce.  Take it to your family Thanksgiving and/or Christmas this year, and I promise you your family will be thoroughly impressed!  The best party?  It's oh-so-simple.

I'm cheating a bit here and showing you the finished product before even listing the ingredients.  If you'll notice, the "casserole" (for lack of a better word) should be shallow in your baking dish.  You want it shallow so you have a good ratio of of cranberry and apple to that yummy topping!  :)
    Cranberry Apple Crunch

Ingredients:
  1. 3 cups peeled & chopped apples   (typically 3 or 4 small to medium apples.  I use Granny Smith.)
  2. 1 can whole berry cranberry sauce
  3. 1/3 cup white sugar   (I use Splenda with fiber and it's just as good.)
  4. 2/3 cup brown sugar   (I use Splenda brown sugar blend.  If you do the same, you'll only need 1/3 cup since it's twice as concentrated as regular brown sugar.)
  5. 1 cup oatmeal
  6. 1/3 cup flour
  7. 1/2 cup chopped pecans
  8. 1 stick of margarine (I use "I Can't Believe It's Not Butter.")

Directions:
  1. Combine chopped apples, cranberry sauce, white sugar, and 1/3 c. brown sugar into large bowl.  Mix together.  Spread evenly into casserole dish.  (**Note:  If using Splenda brown sugar blend, use only 1/6 c. brown sugar...which is half as much.)
  2. Combine oatmeal, chopped pecans, flour, and 1/3 c. brown sugar in medium-sized bowl.  Mix together.  Spoon topping mixture on top of cranberry/apple mixture.  Spread evenly.
  3. Cut up a stick of margarine, placing pieces evenly on top of oatmeal mixture.
  4. Bake at 350 degrees for 35 to 45 minutes.

Well, it's as simple as that!  You have the easiest, most delicious alternative to that nasty cranberry goop people try to pass off as a side dish!  :)

Let me know if you try it or plan to try it!  I'd love to know what you think...even if you hate it.

Also, I'd love to know what your "different" alternatives to traditional Thanksgiving sides are.  Please share if you have awesome recipes!  Don't hesitate to comment and follow.  I'd love to know what you think!


Sunday, October 16, 2011

Cards for Kody--1 Thessalonians 5:11

"There are two ways to journey through life.  You can march...or you can dance."

Those are the words than caught my eye as I stood on the card aisle of the grocery story last week.  I couldn't imagine more perfect words for the purpose.  I wiped the tears that had begun to well up in my eyes and progressed to the check-out counter.

You see, as a member of "the media," it's easy to become desensitized to the stories that air on a daily basis.  We see horrible and wonderful stories come and go through the air waves and headlines, so for the sake of not becoming jaded, we're forced to somewhat block emotional attachment.  However, in my few short years of being a News Producer, there are a few horrible and wonderful stories that clung to my soul.

Of course, the true producer comes out in me.  I'm going to share the most timely of those stories with you right now.  :)

Kody's Story...

Kody Lucas is a Central Georgian living with a brain tumor; a stage three Anaplastic Astrocytoma brain tumor, to be exact.  When diagnosed, doctors gave Kody two years to live.  It's now been four years, and Kody even graduated from high school--a day he didn't think he'd see.

As if that isn't a remarkable miracle in and of itself, that's not the reason I want to share his story.  
I want to share Kody's story because of the 960 lives he's saved.

I was first introduced to Kody through a story by one of our reporters, Michelle Quesada.  I was immediately inspired by Kody's spirit.  While he had the most remarkable survivor and fighter tale, it was never his focus.  Michelle's story detailed how blood transfusions help Kody gain strength while in the hospital fighting against cancer.  That's where Kody discovered a calling: to hold annual blood drives.

Every year since his diagnosis, the teenage boy (now 19-years-old) has chosen to celebrate each year--that could easily be his last--by holding a birthday blood drive bash.

Kody's impact over the last three years?
960 lives saved
Over 40 gallons of blood donated

Now comes the more solemn news...
On October 13, we reported that hospice recently entered Kody's life.  The news brought tears to my eyes because of the inspiration Kody and his story have been to so many people...including myself.

Kody's family reached out to our station and let us know that there is one thing that helps get him out of bed each morning--greeting cards.  Not "get well" cards, but "thinking of you" cards are what brings a priceless smile to his face.

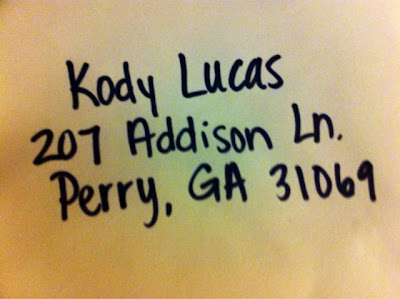
So they asked that we air an address for people to write to Kody, and of course, we did.  I've already sent my card to Kody.  
Here it is below:

It was perfect.
I realized that if I could bring a smile to the teenager's face just by letting him know that his story mattered to me, I'd do it a hundred times over.
I've never even met Kody Lucas in person, and if it weren't for our reporter Michelle following his story, I'd have never heard his story.  
But I can promise you one thing:  it's one I'll never forget.

So I have a request...
Please send Kody a card of your own!
Could there be anything more simple to put a smile on someone's face?

Here's the address.  Please spread the word. 
Let's make sure Kody's mailbox is full to capacity every day of the rest of his life!


"Therefore encourage one another and build one another up."  
1 Thessalonians 5:11a


Meet Kody Lucas:


Monday, October 10, 2011

Tried and True--Products I love!

We all (as least us girls) have products that we used once, and never, ever looked back. I mean there are so many brand names, etc. to choose from, once you find one that works...by all means...stick with it! These are what I call Tried and True.


This is hopefully the first in a series of "my favorites" type blogs. You may read them and just find out a little bit more about me, but I have hopes that maybe you'll take something away with you and find it useful!


So without further ado, I'm sharing some of my all-time favorite products. In no particular order...

Maybelline's "Falsies" Mascara

I have short--and rather thin for that matter--eyelashes. This mascara has absolutely done wonders for me! This mascara is great for those who love the "big lash" look. I get it in "Blackest Black." I've used MAC's "Falsies" type mascara and didn't like it at all. I've even tried other mascaras recommended by friends since I found "Falsies," and nothing compared. I know mascara is a huge "to each his own" type of product, but if you're like me and just aren't gifted in the lash area...give it a try!


Jergens "natural GLOW" Face Moisturizer


It's hard to describe why I love this face lotion other than it just plain works well. It's also available in "medium to dark" tones, which I use most often. However, since I've cut back on tanning (*sigh*), my skin isn't the color it used to be! I put this on in the morning and at night after I was my face. It's not the least bit oily and it has SPF already in it. I don't use it so much for the color as the even tone. If you have freckles, etc...this really helps even out the tone of your face so that you can wear makeup less often! (And who doesn't love that?!) It also goes well under makeup. I find that a lot of moisturizers get oily under makeup, but this one really doesn't. I'm definitely sticking with this one!


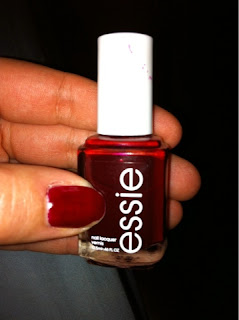
Essie Nail Polish in "Bordeaux"

Pretty sure this gorgeous red will forever be my "go to" color.  This is a new favorite that I discover a few months ago.  While the deep, wine red is definitely more of a fall/winter color, I may just sport it year round!  I really do love it that much.  This picture (nor the one on their website) doesn't do the color justice.  It's a much deeper red than it appears in the picture.  I love essie nail polish because it stays on so long.  Even OPI comes of my nails really easily.  It's also SO incredibly glossy that I never use a top coat.  In fact, a top coat actually dulls the color.


Victoria's Secret PINK Supersoft Body Lotion
in "fresh & clean" and "fresh & fierce"

Ok, so let me just say that I love Victoria's Secret anything and everything.  This line of lotions is the softest lotion I have ever used.  Period.  My all-time favorite scent is the one of the left in the pink bottle.  However, a few months ago I tried their news scent, in the zebra print bottle, and fell in love with is as well!  Now I just switch between the two.  These scents are exactly what they say...fresh!  The smell is a light, girly scent.  I use this lotion literally every single day.  If they ever discontinue either one I'll be heartbroken!  :)


Victoria's Secret Yoga Pants
I warned you that I love Victoria's Secret! :)
Anyway, these are by far the absolute BEST exercise pants ever.  I don't do yoga, I do ZUMBA!  (A topic for another blog!)  My point is...these pants can be used for anything active or just lounging/errand running.  Even though they are tight, the material is very forgiving!  I've tried on many other brands of yoga pants--from Nike to Wal-mart--and they aren't even the same.  The other brands are unflattering on me.  These pants stay in place, they're comfy, and they're more figure-flattering than other brand names of the same.  When these babies go on sale...I snatch them up!


MAC "Studio Fix" Foundation and Powder


This makeup is amazing.  There's not even much more to say about it.  It covers well, it stays on all day pretty much, and the bottles/compacts themselves last forever.  Because I'm not a huge fan of spending money, I used drug store face makeup for the longest time.  It wasn't until my friend Lauren told me how much she loved MAC foundation that I gave it a try.  She was right!  It's awesome!  I actually love most anything MAC has to offer now.  They're lipsticks and eyeshadows are fab too, however this face makeup is "tried and true" for me!


Nature's Own "Double Fiber Wheat" Bread
(Hey, who said these products would be just beauty?!)
I eat an extremely high-fiber diet.  (If you're curious why, see my 25 Things post, numbers 4 and 5.)
As for why this is the only sandwich bread I'll eat, the nutrition label totally speaks for itself.
Per 1 slice of bread: 50 calories, .05 grams of fat (not trans or saturated), no cholesterol, 135 mg sodium, 13 grams of carbs, 5 grams of fiber, less than 1 gram of sugar, 3 grams of protein.
Enough said.


Eggland's Best Farm Fresh Eggs

Yes, Eggland's Best eggs are more expensive than the others.  (Look for coupons)  However, there is a reason.  The chickens that these eggs come from are fed a highly nutritious diet.  My Mom's doctor first recommended these eggs to her because of her cholesterol levels.  After I educated myself, I started buying these and never turned back.  This is coming from someone that absolutely loves eggs.  I eat eggs ALMOST every single day.  Here's why I love Eggland's Best:
1.  They have slightly less fat than ordinary eggs.
2.  They contain over double the amount of Omega 3's
3.  They contain less cholesterol
4.  They contain way more Vitamin A, D, B2, B12, and E as well as other minerals. 
5.  They genuinely taste better!!


Matrix's Biolage Color Care Shampoo & Conditioner

Besides the fact that this stuff smells amazing, it keeps color brilliant and gives a silky shine!  It makes me hair super manageable and healthy.

Revlon Colorstay 12 Hour Eyeshadow
(Not in these colors though.)
Revlon says this eyeshadow lasts 12 hours, and if it doesn't, it's pretty darn close!  I have this eyeshadow "quad" in several different hue packs.  I really like that you can just do a one-stop-shop and get 4 colors that go nicely with each other.  You don't have to spend a fortune, you get 4 colors, and it lasts all day!  It's an all around "win" situation.


Well, that does it for my Tried and True products.  (For now, at least!)  What do you think?  Have you tried any of these products and loved or hated them?  What are some of your favorite products?  Let me know...maybe you'll land me a new favorite! :)

Monday, October 3, 2011

Cheeseburger Rollup (Husband's Favorite!)

Cheeseburger Rollup...
It's been so long since I found this recipe that I don't even remember how I stumbled across it (as usual). Now that I have a blog, I've begun to pay more attention to that sort of thing so I can give credit--the type of thing I just didn't think of before. But I will say, some other person came up with this recipe...it's definitely not my original. ;)


Anyway, this is one of my my husband Brian's absolute favorite meals that I make.  The best part?  It's -so- easy!  It's a win-win situation for us both.

So without further ado...

Ingredients:

1 lb. lean ground beef
4 strips bacon, chopped
1 small onion, chopped (I only use 2/3 a small onion)
1 (8 oz.) package Velveeta cheese, cut into cubes
1 (13.8 oz.) package refrigerated pizza crust


Directions:
1. Preheat oven to 400 degrees


2. Brown ground beef, bacon, and onions together in large skillet. Drain.


3. Once drained, add cubes of Velveeta to skillet mixture and melt. Once melted, remove from heat and let cool for 10 minutes.
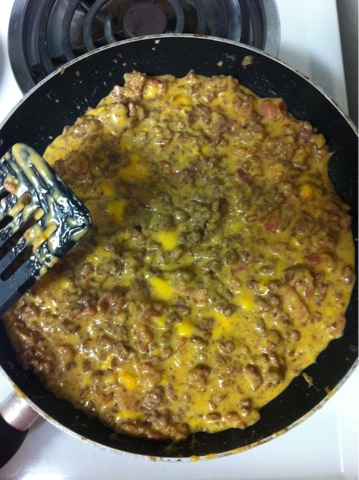
Ground beef, chopped bacon, and chopped onion already browned and drained with Velveeta added and melted.
It's cooling.


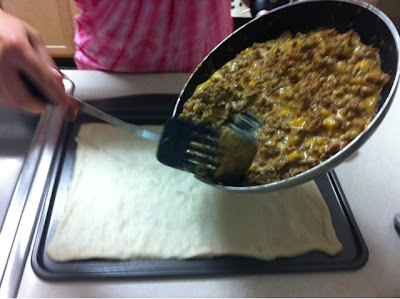
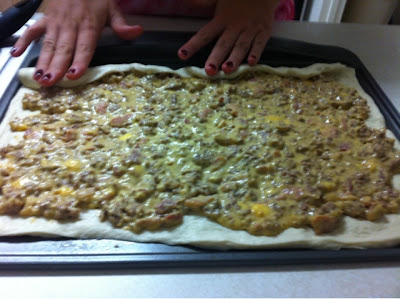
4. Unroll pizza dough onto baking sheet sprayed with cooking spray. Press into 15 x 8 rectangle and top with skillet mixture. Roll up, starting with one long side. Rearrange as necessary so that the roll is seam-side down.
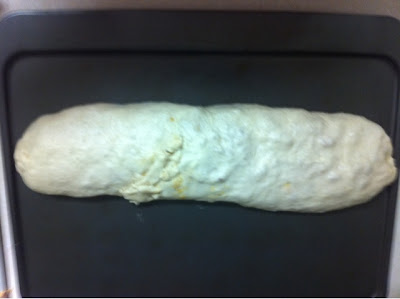
I got a bit of a tear in mine, so I had to pinch it and mend it back together! :)
Topping unrolled crust dough with cooled skillet mixture.

Carefully and evenly spreading mixture on dough.

Rolling up from the long side.

Roll seam-side down on lightly-greased baking sheet ready to be backed! Yes, the tear looks bad.
5. Bake 20 to 25 minutes until golden brown.

Finished product!
Inside view

Ok, so it's not the fanciest meal...and it's certainly not pretty, but Brian can seriously eat half of this roll in one sitting!  In fact, I'm pretty sure he did.  :)  Let me know if you make it or plan to make it.  Also, be sure to let me know what the men in your life (or just you) think of it! :)  (But let's face it, this meal has MAN written all over it!)

Share some of your boyfriend's/husband's/father's/brother's/grandpa's favorite recipes with me in the comments section!  I trying to cook up new recipes for my man. :)

Be sure to follow and keep coming back.  (Top right above the "About Me" section.)

Until next time! XOXO

Monday, September 26, 2011

How to: Customized Decorative Stand

We all have talents... but "crafting" was never one of mine!  Even as an adult, I have a hard time coloring inside the lines! :)  With that said though... I REALLY do enjoy craft projects.  So it occurred to me lately that although I don't have a knack for it and it doesn't come to me naturally, there's no reason I can't get better at it!  I mean, practice makes perfect, right? :)  So my goal is to at least try craft projects that I'm interested in.  I mean, what is there to lose?  (Except for valuable things like time and money...ha!)  As long as I keep the projects inexpensive, it's going to be a go from here on out!  I personally am very satisfied with the results of this experience.


This is an original idea, but I must say it's been derived from ideas like this DIY serving platter (by fellow blogger Jamie Cooks it Up) that I found through Pinterest.

I love these decorative stands because they were cheap, easy, and customized! I went to my local thrift store and dug around until I found the exact plates/chargers and bases that I wanted. I then went to Wal-mart and got spray paint colors of my choice and Gorilla glue! Here are my supplies and what I started with, as well as what it looked like when they were glued.

I paired the smooth charger with the smooth base (I think the bases were supposed to be chunky candle sticks), and the textured charger with the textured base. I chose a green color for my living room to go with my color scheme. 

I then "Gorilla glued" the chargers and bases together.  After they were completely dry, I spray painted!
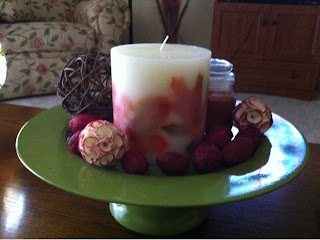
 This is the end results below!  (I don't like the red and green together because it reminds of of Christmas, so that stuff is just there until I can get something else.)


I have these randoms on the green right now until I get different stuff to go on.  Probably several different size candles is what I'll end up doing.
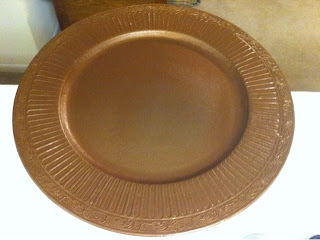
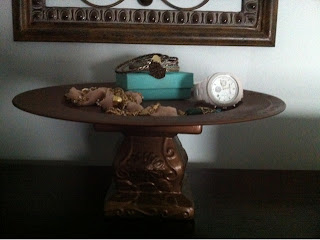
The top of the bronze.  I like that it has a textured rim as opposed to the smooth rim of the green!
Finished product of the bronze.
The bronze is in our bedroom right now and is currently serving as my jewelry catch-all! :)
What do you think?  Let me know!
As for the next project... that's still undecided.  However, I'm thinking about doing something with Hodge Podge!

Friday, September 23, 2011

It's Fall, Y'all!--Pumpkin Ooey Gooey Butter Cake

Happy Fall, Y'all!

I honestly don't know if I have ever been so excited to see fall in my entire life! This has been an unusually hot summer, even for Georgia, and I'm definitely ready for cool (not cold) weather.

Just today, I wore a light scarf, jeans, and boots...and it was still in the mid 80's today. But I can't help it--I've caught fall fever!

Tomorrow morning my church is having a ladies' event called "Taste of the Forest," (since we're Pine Forest Baptist Church--cute, right?) where you bring a food item to share plus the recipe to go in a church-wide cookbook. Well, I don't have many "original" recipes...but I'm pretty good at following them. :)

I've gone with a variation of Paula Deen's, "Ooey Gooey Butter Cake." It's PUMPKIN! I absolutely adore spiced, pumpkin-flavored anything, and I figured what better way to celebrate the beginning of my favorite season? :)

What you'll need...

1 (18 1/4 oz.) box yellow cake mix
1 (15 oz.) can of pumpkin
4 eggs
1 (8 oz.) pkg cream cheese
2 sticks of butter
1 (16 oz.) box of powdered sugar
1 tsp. vanilla extract
1 tsp. cinnamon
1 tsp. nutmeg
**(I use additional cinnamon to taste, along with some all spice, ginger, and cloves because I like pumpkin good and spiced. You can also just use pumpkin pie spice if you like a spices on the mild side.)
Cake:
cake mix
1 egg
1 stick of butter, melted

In large bowl, combine the entire package of cake mix, 1 egg, and one stick of butter melted and beat with electric hand mixer until well-blended. Pat mixture into a lightly greased 13 x 9 baking dish/pan.


Filling:
cream cheese
pumpkin
3 eggs
1 stick of butter, melted
vanilla extract
powdered sugar
spices

In a large bowl, beat pumpkin and cream cheese until smooth with an electric hand mixer. Beat in eggs, butter, and vanilla. Add powdered sugar and spices and mix well. Spread evenly over cake mixture.

Preheat oven to 350 degrees. Once the temperature is reached, bake 40 to 50 minutes. Be careful not to overcook...the center should still be "gooey."


Finished "Pumpkin Ooey Gooey Butter Cake"

Don't ya like how a the left corner is gone?! haha. I had never made it, so I had to make sure it was tasty enough to 1.) take to "Taste of the Forest" and have put in a cookbook and 2.) share with y'all!

Verdict: Tasty, DELICIOUS, SCRUMPTIOUS!

I've always liked pumpkin pie, and this "takes the cake" over that any day! However, as you can see from the entire box of powdered sugar and 2 sticks of butter, it won't exactly shrink your waste line. But it's all good; we Southern folk' can handle a little extra butter now and then. ;)

I hope y'all have a wonderful weekend of fall fun! Until next time!

Sunday, September 18, 2011

Chicken & Dumplings (embarrassingly easy...I promise!)

Chicken and Dumplings...
It sounds daunting, I know!  But it really, really doesn't have to be.  I fully believe that it's alright to take short cuts as long as you aren't a professional chef!  But in my opinion, these are better than -any- others I have had.  However, this is my Mom's recipe that I've grown up on, so I guess there's a chance it's just personal preference.  However, as EASY as these are...you won't be out anything to try them for yourself and see!  They're the ultimate comfort food for fall and winter.

Here's what you'll need...


32 oz. box of Chicken Broth (you decide if you want low sodium or not)
1 can of Cream of Chicken soup (regular soup size can, unsure of the ounces)
1 package **Mary Hill frozen dumplings 
(only use Mary Hill, other frozen dumplings aren't near as good.  I know for a fact I've found them at Publix and Kroger...never tried anywhere else.)
Raw chicken (not pictured) (I use 1 pkg. boneless thighs, but you can also use a small chicken.  I don't suggest using all chicken breast because the flavor isn't as good.  If anything, mix dark and white meat.  Also, DO NOT use cooked chicken... you'll be very disappointed.)
Black pepper to taste (I put a lot!)
**Garlic salt/power to taste
 (If you use low sodium broth, use garlic salt.  If you use regular broth and soup, use garlic powder)


Directions:
1.  Put your chicken on to boil.  (Yes, boil, and only boil.)  Fill up a large pot with enough water to cover the chicken (although the chicken isn't in there yet) and bring to a boil.  When at a rapid boil, turn water to medium and add chicken.  Keep temperature right below or at a low boil until chicken is done.  Cooking time varies, but you can't "over cook" boiled chicken, so longer is better than not enough.  Mine cooked for about 40 minutes I think, but it probably didn't need that long.  As long as the internal chicken temperature reaches 165 degrees for 15 seconds, you're good.  Don't season the chicken water with anything at all.  Only boil in water, not chicken broth.  If you add anything, it'll be too salty.

2.  In a separate large pot, pour entire box of chicken broth and bring to a boil.  When it reaches a boil, turn the stove setting to "low."  Add each dumpling to the broth individually.  When you're done adding the dumplings, give it a gentle stir.

3.  Add cream of chicken soup, garlic salt or powder, and black pepper and give it another gentle stir.  Cover and cook for about 25 minutes, or until tender.

4.  When chicken is done, remove from water and cut into bite-size pieces.  Don't throw away the water!  

5.  Add chicken to dumplings and gently stir until mixed.

6.  This part has to be done by "eye balling."  Depending on how "wet" or "liquid" your dumplings are, you'll want to add some of the water the chicken was cooked in.  Usually, anywhere from 1 to 3 ladles full.  I used two, but depending on your tastes, you could us more or less.

7.  ENJOY!  Goes well with green beans, collards, or mustard greens.  However, it's great as one-dish meal!

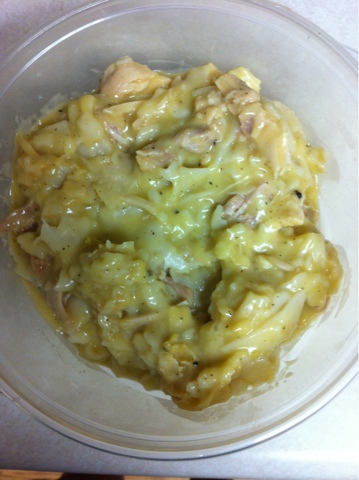
Should look something like this...


I didn't take any step-by-step pictures, and the dumplings kind of broke when I put them in the container for leftovers, but you can hopefully tell how tasty they look!

It's certainly not homemade dumplings and the recipe is embarrassingly easy (see, I told you!), but no one will know how easy it is.  It truly doesn't taste like it or I wouldn't be sharing the recipe!  I prefer this recipe to homemade dumplings, but that's my personal taste.  Please, please try them and let me know what you think!  (Even if you don't like them!)  And if you're scared of boiling chicken, just trust me and do it.  Also, if you typically dislike dark meat, I promise you'll like it in this recipe!  However, you can use half white meat and half dark meat.
Have fun eating your comfort food, and HaPPy FaLL, Y'aLL!

Saturday, September 17, 2011

Freaky Fridays--my fave pointed toe flats under fire!

Do you ever have those moments on Fridays that just don't belong on one of the happiest days of the week?  It's the little things--or big things--that just put a damper on what would otherwise be a perfect start to the weekend!  To capture these little pesky little moments, I'm going to try a weekly Freaky Fridays blog! 
 So without further ado, here's my Freaky Friday moment for the week.

I've been meaning to remember to take pictures of my outfits every day of the week for a new blog (explanation post for a different day).  Needless to say, I keep forgetting to snap the pictures.  So today as I was getting dressed for work, I made a mental note that I -would- remember to take a picture today!

So, half the day's gone and I still haven't taken a picture.  I totally had forgotten.  But I was about to remember soon enough!  Long story short, my Mom ended up coming over to my apartment on my dinner break from work.  We had a nice visit, but as we were walking back out to get in our cars (I was headed back to work, she was headed home), she takes a look at my outfit and notices my shoes...they were grey, suede, pointed toe flats.  She says, "Are you sure pointy-toe shoes are still in style?  I don't ever see anyone where them."  I tried explaining to her than nothing goes better with skinny jeans than a leg-lengthening pointed toe shoe!  But she didn't get it... 

This week's Freaky Friday moment:  Having to listen to listen to my 50-something-year-old mother attempt to give me a lesson in fashion.

However, I absolutely loved my outfit today!  Although it was under attack, it reminded me to snap a pic of clothing choice for the day!  Unfortunately, you are seeing the half-done version because it was taken by a co-worker at 10:45 p.m. :)  Earlier in the day I had on bracelets, my hair was fixed, and my shirt wasn't wrinkled!

Shirt: Stein Mart sale (It has a lot of pretty embroidery and lace detail that doesn't show up in the picture.)
Black skinnies: Old Navy sale
Grey Pointed Toe Flats: DSW clearance (They have tiny, round, metal studs on the top that don't show up.)

And just in case you're wondering, pointed-toe flats are still hot, hot, hot!!  ESPECIALLY for Fall 2011.  (Ugh, what do Moms know?!)


The above picture is from online fashion magazine niche.  
It's an article on Fall 2011's "must have shoes."  I highly recommend the article!

Here are a few of my personal favorites...from bargain to splurge!


Well, that concludes my Freaky Friday moment.  I'm going to try and post every Friday.  I'd really love to hear about yours too!  (Even if you have to write about it on Saturday or Sunday!  :)